
Primary Goals:
1 - Sealed chest next to Statue (NE) contains the Silvarion Sword, basically a Broad Sword with Light attributes. Need a sword with light attributes to hit the 'star' on the statue to break the seal.
2 - Sealed chests in the Tomb of Queen Noel Forester (far NW corner). You must pass through most of the Ancient Battlefield and then speak to Ed Edmund, who will be at a new position than when you first found him, before HE unseals the tomb. Chests contain a Truth Glass, 1000 Gold and the Royal chest in the hidden room contains a Crystal Flask.
|
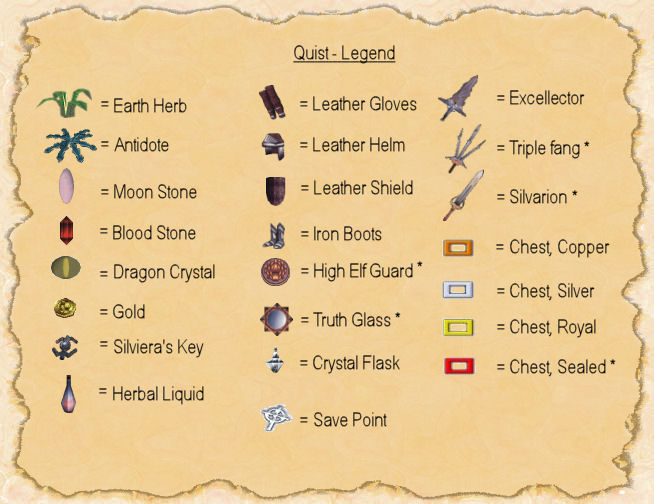
Items List: Earth Herbs Antidotes Dragon Crystals Bloodstone Moonstone Herbal Liquid Crystal Flask Truth Glass* Gold |
Equipment: Excellector Silvarion* Triple Fang {R} Leather Helm Leather Arms Leather Shield Iron Boots High Elves Guard {S} |
* = Must come back later or satisfy some special condition to obtain; Will be described in the Walkthrough.
{x} = A key is needed to obtain. C=Copper; S=Silver; J=Jail; M=Magician; O=Orladins; R=Royal.
Stop for a moment and activate your main menu. Go to the Equipment menu. You will see you already have on Leather Armor. Scroll to the bottom where it says 'Button' and select it. Then select Earth Herb, thereby assigning that item to the 'Select' button on your controller. For now, that will be the best item equipped to that button.
There are 2 save points in this game, and I will guide you to the closest one first. If you look on the map you will see in the NE area a statue of a knight holding a sword aloft. Just below this and to the right is a little 'boot'-shaped area that contains the first SAVE point. But to get there, you will have to cross a bridge and weave through some man-eating plants called Mantraps. If you wish to SAVE now, head down the orange trail to the Bridge, but stop first to pick up the Earth Herb on the left side of it.
Cross over the bridge and RUN/SPRINT through the Mantraps using the 'X' button with the directional arrows to get to the SAVE point. No creature can enter an area with a SAVE point so you will be safe. Because there are so many Mantraps around, concentrate on taking them out 1-on-1. If you start to get ganged up on, back off and go after another one by itself. Until you get enough levels under your belt and armored up, you will die with only a few hits from these creatures. Play it safe for now.
A trick to aid this is to move slowly forward towards one until it starts to approach you. No other one should be following or near enough to sense your presence. Once it starts getting close enough, back up so it has to move closer again. Do this until you have it all alone and you will not attract any other Mantraps while battling this one.
The Mantrap just NE of the middle hut (which is due North of the bridge you just crossed over) will drop Leather Arms. Equip it immediately. Every bit will help. Visit each building and speak to each person several times until they begin to repeat themselves. You will notice there are a few of the Mantraps that regenerate. Visit each of the objects like chests and barrels, etc, to search for items to add to your inventory. Once you have pretty much cleared this area of Mantraps at least once, proceed back towards the Bridge you originally crossed over to get into this area. Do NOT fall down into the well you find up here and do not enter the gate in the far NE corner area just yet. That is where you will need to go to proceed to the next area, but there is more to accomplish just yet.
Once down near the bridge but still on the North side of it, head westward along by the water. Take out the Stool, the large mushroom, by moving quickly forward, timing your attack to hit just as you arrive next to it, and then immediately back off. These creatures will shoot out a curtain of spores in a 360 area that will poison you if they hit. If you stand right next to it while this happens, you will be continuously hit by dozens of spores and you will quickly die. Hit it about 3-4 times and it will die.
Take out the approaching Mantrap and then go a little farther and pick up the Leather Helmet on the ground. Soon, you will find the Leather Shield and the Iron Boots! If you proceed a little farther West, you will encounter a N-S running wall that ends close to the water, and just beyond is another bridge. It is possible to pass around this wall and not to fall into the water and die. By the way, ALL water in this game equals death. Any river, lake or well with water in it will kill you because the game assumes that you cannot swim. So be careful when you get too close to the waters edge.
Now pass through here and cross over the bridge to the southern area, saving the northern side of this bridge for later. Kill off the Mantraps here and be aware that the Mantrap in the trees will drop a Silviera's Key, a green key that can be hard to see on the green grass of Quist. Do not miss this item for it is one of 2 you MUST have for the next region.
The chest in the far Southwest cannot be opened at this time, you will need the Copper Key to open it. It contains 1000 Gold. Move Eastward past the wall on the right and all the way up the small rise. Take out the 2 Mantraps here and search the barrels for an Earth Herb. There is another one on the Southern side of the stairs next to the torch. The first chamber has a chest in it that contains a Moon Stone, which helps to regenerate 40 MP's. There is a secret door on the West wall near the North end. Do not search for any other secret doors in this walkthrough unless you are ready to get slammed with a spear trap that could kill you in one shot.
Once into the next chamber, you will encounter a Skull Guard (skeleton with sword & shield) guarding a chest. Right now, this skeleton may as well be a boss, because it can kill you in 1-2 hits while it will take almost 8 or more to kill it. And it will continuously attack so long as you are lined up in its sights. The chest holds the Leather Shield, so if you feel particularly adventurous, it may be possible to grab the shield and get out before being killed, but it will get hairy for a while.
There is also a secret door on the West wall in the Southern portion. You will pass through into another chamber, this one empty. Search the exact same area of the next West wall for the next secret door. You will now see a long hallway. Before you go on, you should know some things. There are two treasure chests in this area, one of which is behind a secret door on the North wall about halfway down the hall. That chest is a Royal chest and can only be opened with the Royal Key, which is not available until MUCH later in the game in the Passage of Death.
The other chest at the end of the hall can only be opened by the Silver Key and holds the High Elves Guard shield. When you get close enough to this chest, the roof will open and another sword-wielding skeleton will attack. There is also one in the chest with the High Elves Guard. Right now, these guys are killers. They are just like the one back by the Leather Shield, enough to challenge you, but the close confines of the narrow hall makes it worse for you and good for them. So, in reality, this is not a safe area right now. But if you want to try, go ahead. They are worth good experience for you right now, but by the time you can obtain the first Silver Key they will be easy to deal with. Exit the Tomb area, take care of any Mantraps you find as you go back to the Bridge in the east area.
Cross over it into the as yet unexplored Northwest area. Move to the destroyed walls of a building, perhaps someone's home, which now has 2 Stools in it and take then out one at a time. Collect the many Antidotes found here and the Dragon Crystal that the second Stool drops. Head straight North, taking out the Mantraps, and pick up the Earth Herb to the West a little and the Blood Stone that is found on the corpse in the really narrow section in the farthest point you can go from here. Return to the former house and you may find another Stool. Directly to the West of this house is a path that curves North with another Stool blocking your path.
This narrow path has embankments that CAN be climbed, but you must RUN/SPRINT up them, and even then it is slow going. This remains true all over Verdite. Once past the Stool turn to the West, and head up the small hill that forms the embankment of the path you just walked through and turn South. You should see a purple spider, called a Red Eye, coming to engage you. Keep moving around it and hit it when you can. If you keep moving and pick your shots carefully, you should kill it within about 5-8 hits. Proceed South to the hut. Open the door but do NOT open the chest yet. Move around the chest until you can see the bones behind it and grab the Earth Herb that is not visible but is there. For now, leave the chest. It contains the second Silviera's Key you need, but it also contains another Skeleton. The other Save point is near so wait until after you have saved until you come back to take on the Skeleton. Leave the hut and concentrate on the Stools, killing all of them in this area. After the last one, head South toward the river to find a chest that does not need a key.
This chest is a trap with a poison mist, but contains the Iron Boots. The way to open it is to walk right up to the chest, angle your view down a bit, press the key to go backwards and immediately after that, hit the 'X' key to open the chest, continuing to walk backwards. If you do it right, you will not be poisoned. After the poison mist fades, grab the Iron Boots and equip them. Now head past the area where you encountered the Red Eye and head North into what looks like a cave, but is just a hole in the wall. You will encounter 3 Red Eyes.
You can fight all three at the same time by being very cautious. Use the Strafe function (Left1 and Right 1 Keys) in conjunction with your directional keys to 'dance a circle' around them while looking 'into' the circle. When you line one up and are to the side or back of it, move in, hit it, then go back to 'dancing a circle' around the group. Be careful not to let them crowd you into a corner or you will die. One by one, with patience, you will kill them off. Of course, you could just run through them to the cave in the East rock face, go downstairs and Save first if you want. Then go back and 'dance a circle' around them. Either way, just be patient here and you will win. When finished, Save.
OK, head North again, grab the Earth Herb and finish off the Stool, then examine the tombstones to find 100 Gold. Head North again and enter Queen Noels Tomb. Right now, only 1 of the chests will open and give you a Herbal Liquid. There is an Antidote in one of the Barrels. There is also a secret door in the middle of the South wall, but there are 2 Skeletons Guarding a Royal Chest that does not need a key to open. It is already unlocked and contains a Crystal Flask. The other chests will not open until after Ed Edmunds offers to open the access to you and Contain a Truth Glass and 500 Gold. By the way, remember the Queens name, Noel. There is a Lake named after her you will arrive at later.
Now go Save, and then head to the hut I told you to bypass. Take out the Skeleton and claim the Key. It is possible to open the chest, grab the key, and back away in time to get out of there and not encounter the Skeleton if you want. Once killed though, go save again then buy some herbs and antidotes if you want them. Head on back to the far Northeast area of Quist where all the Mantraps were and head through the gate and on to the next area, the Ancient Battleground.