
--------------------------------------
IW - Bewilderment Domain
--------------------------------------
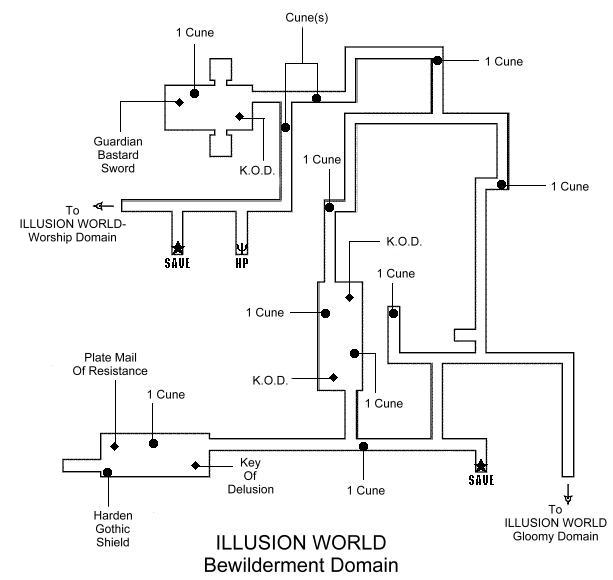
You enter this Domain facing N.
This domain is anything but what its name implies. Yes, there are odd things that happen, but they do not 'bewilder' the player. And because this Domain is mostly comprised of corridors and there are 'creatures' in the corridors, I will warn you that I will be using a lot of NSEW directions. It might be easy to get confused if you are not using the maps. I will also use references of the 'crossroads', listed as CR1, CR2, etc. These points are places where the corridors cross or branch into another corridor.. I will only note those that are significant to this walkthrough and that will make movement through the level easier.
There are also different tactics that you can use on this level. Because the 'creatures' in the corridors are actually mask-like creatures that are hanging on the walls, there are 2 primary ways of dealing with them. Defensively and offensively.
You can walk with a shield raised to help deflect the fire- and frost-balls that will be hurled at you as you approach the creatures, or with the bows equipped and ready to fire. Your choice. But fair warning; there is ONE of these creatures you do NOT want to kill. He will not be firing magic at you though.
There are also 2 Save points on this level! I will take you to the first one and then we will engage the rest of the creatures.
One more thing. The Key of Delusion. There are 2 of these keys possible to find outside of one of the 6 treasure chests on this level. 4 of the chests on this level have Keys of Delusion in them, 2 chests have Equipment in them. Also, 2 of the chests on the prior level need Keys of Delusion to open, although only one of those has anything in it. So, as you obtain the 'loose' Keys, consider carefully which items you will want to obtain. Because these Keys are ONE TIME USE KEYS. You use it and lose it. You can open all the chests if you want. All but 2. The empty one in the Gloomy Domain should be one of the last 2. The other one is up to you. You can use the first key you obtain to open the next chest with another Key in it, then go to the next chest with a Key in it, etc.
Ok, onto the level.
Facing N, start walking, turning W at the bend. Proceed a short distance to the first branch heading N. This is CrossRoad1 (CR1). There is a Gargaral in the Western wall niche in the N corridor that you HAVE to attack head on. You can try strafing with the bow, but it requires a lot of work and timing. Just beat it down with a Bastard or one-handed sword. Now Head N but DO NOT kill the GorGoral on the N wall. TALK TO IT. It has been lonely and will give you your first Key of Delusion, then disappear. Now, head back S from here to CR1. Proceed W, passing the S corridor (for now) and take out the Gargaral on the wall in front of you that has been shooting fireballs at you. You can step to the side of it and beat it down without taking any other damage. This is true of all these creatures.
By the way, there are 3 types of these mask-like creatures with VERY similar names, so keep track. All Gargarals and Gordorals drop Cunes unless otherwise noted.
Now step to the N, ignoring the fake spear trap and pick up the Cunes on the floor. Go back to the S branch of the corridor and target the Gordoral firing frost-balls at you at the far end of the S corridor or head down there and kill it. This point is CR2.
Head to the E and turn S to the first Save point.
Go back to CR2 and head W, picking up the Cune before you reach the N corridor junction. Do NOT go N yet. Head W some more and you will come to the first Battle Room.
As you approach this room, expect the screen to turn red as you become cursed from the rotting face sitting on a shelf above the door. Ignore the effect for now and head into the room to engage the Death Mages.
The Death Mages wield Scythes and black lightning attacks. I am not quite sure but it may be a Dark based attack. They are resistant to magic attacks but Frozen Hornet still seems to do the most damage of all magic. Approach with sword in hand and magic combos and they fold pretty quickly. But only the sword will stun them.
After finishing them off, Take out the bow and kill the Rotting face at range. Of course, now you can use the Divine Symbol to take the curse away.
There is nothing in the short corridor to the W. Now head back into the corridor (E) and take the N passage into another chamber.
Demon Warriors that wield 2 swords each like a blender. Do not get caught between 2 or more of them because between the swords whirling (like in a Quisinart) and the Dark Breath attacks (that keep 'hitting' you multiple times) you will die very quickly. One on One is the rule. One thing you can do with magic. Equip Holy magic rings with Cleansing Ray on them, then line 2 or more of the Demons up in a row and fire the Cleansing Ray, it will damage each one as it passes through them. This is the only attack I know of that will produce this effect. The other magic to use is, of course, Frozen Hornet. Equipment with Critical Attack bonuses are helpful here. Kill one, move to the next, kill it, etc.
It is important to save before entering this room. It took MANY tries to get the creatures to Drop ANYTHING! All three of the equipment items mentioned here are worth getting. It is possible to get them all to Drop them, but you really have to 'work' this room several times. And I am pretty sure that the one that did not drop anything CAN Drop something.
The N corridor has an irritating Stone wall with a hole in it that drops down and blocks your progress from both directions. Ignore it and go all the way back to CR1, head N to the wall that held the Gordoral, turn E and pick up the Cune, and turn N and take out the Gargaral on the far N wall.
Turn W and head to the intersection with the N corridor. This is CR3. Proceed W and turn S. There is a Gordoral on the wall ahead. Take it out and turn W. There is a Cune on the floor here and the Stone wall that drops down is just to the S. Now return to CR3. The far N wall has a Gargaral on it that Drops either the Amulet of Resistance or the Sorcerers Amulet.
Proceed W to another Gargaral on the W wall, then S, then W again. There are 2 Cunes in this area, one in the corridor prior to the junction heading S and just inside the S corridor. As son as you reach this corridor, you will become cursed again from another Rotting face on a shelf above the doorway into the W chamber.
The easiest way to finish these guys off is with the Bows. Run into the room and IMMEDIATELY to the left behind the chest and into the SE Corner. Target the Rotting Face first, then use a Divine Symbol. Without moving, Target the first War Demon (Red) coming into the room from the small N chamber. When he dies, another will appear in the NW corner. Move in front of the chest and use the bow & arrow again. Another will then appear in the SW corner area. Take him out. Now, a Blue War Demon with an axe appears in the middle of the room. Back towards the doorway you entered through, still using the bow. When he dies, move into the room and target the War demon in the S chamber.
Now collect everything and leave the room. Take the S corridor and turn W. The 2 S corridors that branch off of this one contain an Hpotion trader and the second Save point. The door at the far W end of the corridor leads to Worship Domain.