**************************************
ILLUSION WORLD
**************************************
Creatures:
82 Red Puppet
83 Blue Puppet
84 Dark Imp
85 Black Imp
86 Dark Bishop
87 Dark Fairy
88 Ring Demon
89 Deha
90 Maristella
91 Gorgoral
92 Gargaral
93 Gordoral
94 Demon Warrior
95 Death Mage
96 Rotting Face
97 War Demon (Red)
98 War Demon (Blue)
99 Gorthaur
100 Master Knight
101 Warpoor
102 Willowess
103 Foster
104 Crossbrood
105 Dark Spirits
106 Disguise (BOSS)
You might expect that the WORLDS with this name, ILLUSION, to be tricky, puzzle-filled, secrets-filled and annoyingly irritating traps and pitfalls, right? Wrong. Almost nothing along those lines happens. Just more levels of monsters, items, and experience. There are no 'illusions' to speak of. The invisible monsters in the BW - Screeching Area are closer to being Illusions than anything here. This was rather disappointing, at least in the expectations that the name generates. So, now you know. Settle in to more fighting and gathering of the fruits of your sweaty brow.
--------------------------------------
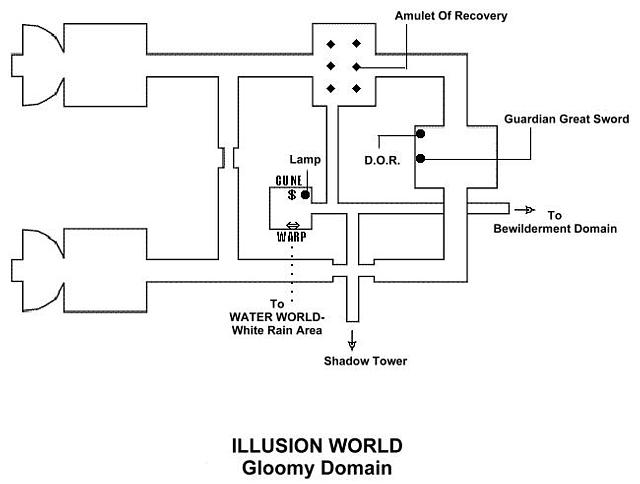
IW - Gloomy Domain
--------------------------------------
You WARP into this level facing N. There is a headstone to the Cune trader in front of you and a Cune just to the Right of it. Now is a good time to trade for the Beast Key since this is the last Cune trader you will encounter before you need that key. The path out of here heads E. There is not a Save point on this level.
If you head straight E from here and down the stairs, you will go right into the Bewilderment Domain. If you take the only right turn out of this corridor and head all the way S, you will find the door to the Tower mentioned earlier. The corridor (off of the E-W corridor) that runs N heads into a chamber containing several treasure chests. For now, take the S corridor and then turn W into a wider corridor. Follow this up the stairs you find and then stop at the top.
This is the first of 2 such rooms, almost exactly the same, except for the musician you encounter (the Imp). As soon as you enter into this room more that one-third of the way to the W wall, the Imp that can only be seen and shot at by the bow will start playing and will drain away your HP's. There are 2 dancing puppets that will essentially ignore you unless you attack them. I recommend moving to one of the N or S walls and waiting for the dancing pair to come over by you by strafing with the L1/R1 keys. Be patient. This will help to insure that they do not attack you from behind while you are taking out the Imp. When they have gathered to one side, then strafe back to the middle and move forward to the hole in the wall. Using the bow, target slightly over the Imps head and shoot him. It will take maybe 3-5 arrows, but this is the only way to kill him quickly. Some spells can reach him, but the time it takes to aim, the misfires into the wall, and the HP draining away make this option impractical. The Imp does not drop anything and you cannot access the room he is in at all. Once finished you may dispose of the puppets at your leisure. Isolate one, take it out then finish off the other. Head back down the stairs and take the first N passage you come to.
There is a narrow spot in this corridor near the middle. For Now, consider this narrow spot as Marker A. More later on this. As you come out of the corridor into a T intersection running E-W, look to the R and you will see stairs going up. At the top of THOSE stairs is Marker B. For now, head W up the stairs to another duplicate room to the Dark Imp Room.
The Black Imp will drain MP and may curse you. Deal with this room as you did the other room.
Having finished off these 2 rooms, the points I called Marker A & B will come into play. From this point forward at least 2 Dark Bishops (possibly 3) will appear at those points, hurling fire at you. This appears to be random but they will appear eventually.
Whenever they do, the Bow is your best initial weapon, unless they close the distance. They also do the 360-degree explosive attack like Magi Magus did so close proximity to these guys is unhealthy. Now head Marker B area and find 6 treasure chests ripe for the picking!
Any smart gamer knows that when you find something like 6 treasure chests sitting in an open area like this, you immediately look for the guardian(s) before opening even one. If you do that, you will find them. Up on the walls.
Taking out the Dark Fairies start with you getting a good distance from them. Their primary attack is to rain down acid on you. And they have good range with it. Again, the bow is the best bet, but magic can be used also. The first attack you make will not do damage, but will make them start attacking you. NOW you can damage them. Fortunately, they do not attack en masse, but only one at a time. Do not open any chests while engaging them. There are monsters in 2 of the chests called Ring Demons that will gladly aid the Fairies in expediting your demise. They are in the NE and SW chests. The NW and SE chests only have voices in them. The W chest is empty. This W chest and the E chest need a key that can be found in the Bewilderment Domain. More on that key in the Bewilderment Domain.
Keep moving when you release the Ring Demons. Use magic and crushing/smashing attacks on them. Once you are finished here, you might want to head out into the Tower and up the stairs heading into the Sunken River area to see if the Water Knight with the Mermaid Key has made an appearance and then maybe into the Watery Labyrinth to boost your equipments durability ratings back up. Or you may want to WARP back to the White Rain area and hoof it directly back to the Watery Labyrinth through the back door. Once done, travel back here for some challenging fighting.
From the Dark Fairy Room, head east down the stairs and turn S.
The Deha's are the headless boxers and the Maristellas are the floating heads. The Dehas seem to be almost totally proof against being stunned and even when they sound like they should be stunned, they come right back at you very quickly. Treat them as if they have a very quick status recovery stat. Some weapons can stun them and potent magic does too. Equip critical effect items for a better chance to stun them. They do not let up their attack and will enter the corridors to chase you. They can also cast a Holy attack at you from its fists and also in an area attack like Magi Magus did. Warning. These are not creatures you want to stand toe-to-toe with. Their punches are many, fast and potent. You will lose HP faster than you can afford to with these guys. Do hit and run type attacks or try ranged attacks.
The Maristellas are actually easy in comparison. Their laugh can paralyze you and won't that be fun with a few of the Deha swarming around you? It can also shoot cold attacks at you, but rarely does if you keep your distance. The bow works quite well, although a good sword works well too.
Try to take out the Maristella first if you can, but do not ignore the Deha. They are fast and relentless, although they do occasionally engage in some private Shadow Boxing by themselves. Once you finished off the first round of opponents, go to the W wall where a knight has been skewered by a sword. Prepare yourself by healing and switching equipment if you need to. Then take the sword from him. Once you do, he disappears and a voice asks if you are ready. Turn around immediately to engage a very fast Deha.
THIS IS NOT A BOSS FIGHT.
He may or may not be followed up by other Deha or Maristellas. Once done, you are ready for the next realm.