**************************************
WATER WORLD
**************************************
Creatures:
65 Dementor
66 Dweller
67 Horned Slime
68 Akryal
69 Blood Brain
70 Worm Face
71 Hatchlin
72 Kabasaur
73 Water Knight
74 Great Frog
75 Gaze Hopper
76 Slashers
77 Manna Python
78 Koazul
79 Winged Worm
80 Dragon Turtle
81 Magi Magus (BOSS)
In these Realms, Water rules in the forms of Acid and Frost. The most irritating part of these regions is that acid attacks the durability of your equipped items in addition to your heath. Often, ALL of the pieces you are wearing lose durability, although it will just concentrates on the parts directly exposed to the acid. So, if you have to walk through an acid puddle, the boots will lose points of durability and you will lose Hpoints as you pass through. There are items that resist this effect, such as anything with the word Caustic in the description. But they are not PROOF against the effect. They only diminish the effect. The acid will still eat up those Caustic Boots if they are left standing in that same puddle. Of course, this effect happens only after you equip it on your character. Unequipped items are never damaged by acid attacks. There are many items to be found in the depths of the acid puddles, streams and pools coursing through these next 4 levels, in wonderful condition for something that had been taking an acid bath for months before you came along. Towards the end of these levels, acid turns to Frost as the deadly danger.
I have a simple solution for moving through at least one level. Take off your boots and take an Acid Vaccine. The vaccine provides resistance to most damage from the acid puddles that you HAVE to go through and you retain your boots in good condition until you need it in battle. You will lose HP faster this way compared to when you have boots on but remember that the Acid
Vaccine does NOT vaccinate the steel boots you are wearing. I went through almost all the boots I had before I figured this one out.
--------------------------------------
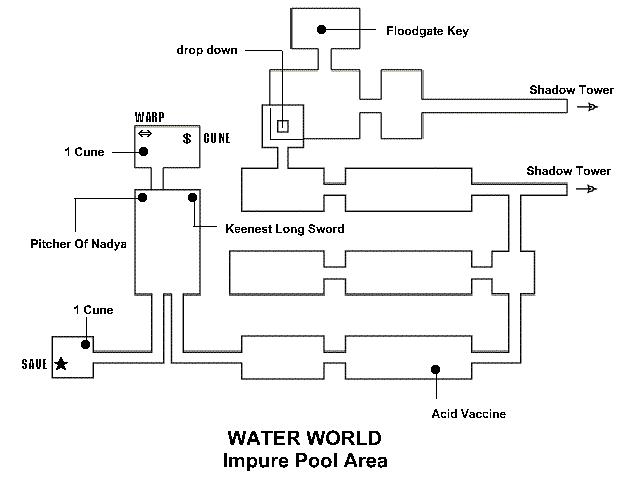
WW - Impure Pool Area
--------------------------------------
You enter facing W at the south-most entrance on the map.
After the Hothouse, you may feel like taking a nice cool bath here. DON'T. The water looks inviting but it is VERY hot, but not from heating. It will scour not only the dirt from your skin, but also your skin and bones with it!
The path to the Save point on this level is pretty easily accessed, but you do have to encounter some creatures and walk through some acid. Fortunately, the pools of acid that you have to pass through are shallow and quickly passed through. What is interesting is several of the creatures on this level will Drop Fire World Stones. So you can come here earlier in the game and obtain these items to help you through the Fire Worlds if you want.
From the entry point, take the first Left (S) into a small square room (Junction Room) with several exits and writing on the E wall. Take the S exit and follow it into a long chamber running E-W and you once again meet the Fat Mole. He chats with you and gives you an Acid Vaccine. Head to the W wall and enter into a room with a shallow acid pond running from wall to wall.
If you can, try not to fight the HS's right now, but if you can't cross the acid pond without fighting, don't sweat it. The ones in the acid drop the feathers. When you can, take the W corridor, and then head towards the N.
Stay on this side of this large pond and head to the left, taking the other corridor on this side of the pond. It leads to the Save point. There is a Cune in the NE corner of the Save point room.
Now head back into the Blood Brains room and take them out. You will have to get your feet wet to obtain the Keen LS and the Pitcher, but you will be using them soon. There is a secret door in the N wall of this room that cannot be opened until you WARP into the room later in the game. This secret room has a Cune on the floor and there is also a Cune Trader found in here.
Head back to the Horned Slime Room and mop them up. Head back to the Junction Room mentioned earlier and head W from that point into another long chamber running E-W.
After finishing here, head into the W room.
Do not attack Akryal. Talk to her first and she will tell you that the water trough behind her is the ONLY fresh water in the Tower. But she needs a certain pitcher...
Give her the pitcher and she will disappear, allowing you access to the water. This trough has water that acts like an Hpotion. One sip is enough. The drawback is that you cannot take any with you. Remember this spot because you may find yourself in need later and can come back here to get your HP's back up. It's a long walk sometimes, but...
Now go back to the entry corridor and head W. Another E-W chamber with Dwellers in it.
Beyond this chamber is another pond room like the Horned Slime Room, but this has much more challenging opponents.
These 2-headed creatures are constantly moving and will keep hitting you until you drop. They can also follow you into the short corridor back towards the last chamber, but not enter it. Use a slashing attack on them if you must. Ranged weapons and magic are best to minimize stepping in acid and getting pummeled to death between the 2 of them. Take the N exit from the room and into a room with a well in the middle of it. The well is full of acid. But you must jump into it to get to the lower section of this level. So decide if you want to lose Hpoints alone or also lose durability from the items you are wearing. It will only be a few points at most but it may be a big difference to you.
After passing through the acid, you will land in a dry room with no discernable exits.
- - - (Gun_46 submitted: Drop Giant Axe, Devil Crown, Dark Great Sword) - - - (guinea_pig@buffline.com also submitted all three items)
Several things to be aware of. If you suddenly become cursed, realize that it is NOT the Worm Faces doing it. It is another creature in the next room behind the secret door in the E wall. If you can, endure the cursed status until you finish off the Worm Faces, then go take it out. Next, if you took off armor before you dropped through, immediately re-equip it to deal with the WF's.
The WF's are easy to stun and I developed a good strategy to handle them, based on the same way I dealt with most of the prior creatures. The WF's turn with every step, so positioning yourself to the side of them is hard. So, just move up to the first one and hit it. This will probably stun it, making it pause in its movement. Immediately reposition yourself to one side and just a little distance away from it. Usually, it will immediately move towards you and 'face' you. If you wait for it, then by the time it finishes orienting on you your strength meter will have reach full power. Swing. Reorient to the side. Wait. Swing. Etc.
You will want to modify this tactic with magic (NOT acid!) and other movement to keep from being damaged by the other WF in here. When finished, go to the middle of the N wall to a second secret door and open it. More WF's but also an important item to pick-up!
Same tactics as before. Pick-up all items and get the key off the table. You will use it on the next level. Exit this room. Now look at the floor and you will see footprints. Follow them to the E wall and open the secret door.
This is the creature that has a constant curse field around it. Kill it before you use a Divine Symbol to counter the curse. Now move down the long corridor and exit back out into the Tower.
--------------------------------------
Interlude - In the Tower
--------------------------------------
You have now reached a place in the Tower where you have options about where to go next. You can finish the WATER WORLDS or go ahead into any of the other Worlds. It starts with the path in front of you.
Move forward until you have just entered the Tower Core. Stop. Picture yourself as standing at 6 o'clock looking forward to 12 o'clock. The path goes straight across to the opposite side (12:00) where the door to WW-Sunken River Area is. Branching off of this path to the left and then down some stairs (9:00 low) is the IW-Gloomy Domain. If you look down to the right from where you are (3:00 low) you will see the doorway to BW-False Eye area. You can get there by jumping from this point where you are standing down to the walkway below. Directly below you (underneath your current position) is the door to BW-Screeching Area. Look back to the BW-False Eye doorway. From there, you can cross the Tower to the 9:00 (very low) position where the DW-Dark Castle doorway is. And from there, you can walk clockwise around to 12:00 and then down some stairs to the Headstone that leads to the Void, the last level of the Tower! Right behind the Void Headstone is a balcony that can only be accessed by dropping down onto it from above that leads to the DW- Lingering Curse Layer. So you see, you can effectively go wherever you wish right now.
This walkthrough will proceed through the Tower in the order of levels as they appear on the Options portion of the Menu screen. But you can do what you want. Of course, the only real problem you will encounter is that of the levels that are 1-way, like the Impure Pool Area you just left. Since you cannot climb back up the well that you dropped down, how do you get back?
Maybe you should stay with this walkthrough for a while. Of course, it is your choice.