**************************************
FIRE WORLD
**************************************
Creatures:
49 Fire Jinn
50 Armored Jinn
51 Jinn Lord
52 Berzerker
53 Iron Crusher
54 Mystic Tower
55 Abraxus
56 Horned Skull
57 Steel Servant
58 Arachness
59 Bone Demon
60 Zygote
61 Cerberus
62 Ruby Demon
63 Ebony Knight (BOSS)
64 Damned Angle
In these Realms, Flame rules. As you will notice, you do not have a lot of fire insurance right now. You will pick up a piece here and there. This is one of the things I like about this game. You do not gain items that help you in the level(s) prior, you gain them as you go along. Of course the opponents are tougher and your equipment's durability rating is going to suffer from the fireballs you get hit with (and you WILL get hit with many). But an adventurer's life is never supposed to be dull. Get ready. You are now about to enter the Phoenix Cave.
--------------------------------------
FW - Phoenix Cave
--------------------------------------
TO GET 100% Creatures = 20
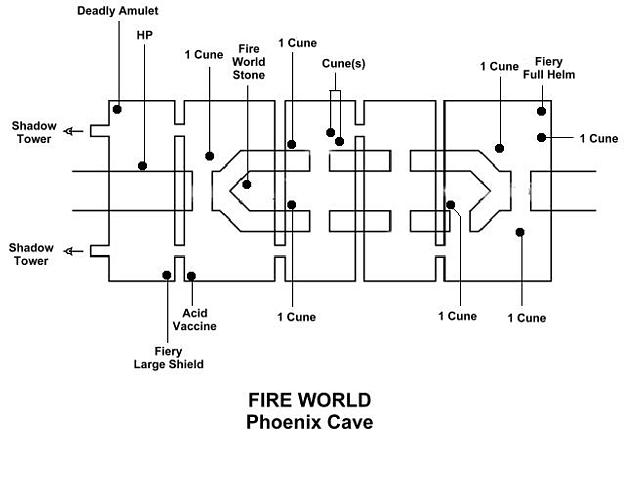
On the map, this place somewhat resembles a basketball court to a limited extent. It is hard to name the specific sections/areas in this Realm, so I will arbitrarily name each area separated by an archway or bridge by a name like Area A, Area B, etc. Therefore, this section of the walkthrough will look and read differently than the others. It will be more step-by-step in most places.
You enter this area facing East.
You are in the SW corner of the Cave. This is Area A. To your left you can see a lava river heading E. You can actually walk over this river (and survive!) but not without losing a great deal of your HP. From this start point, straight ahead (E) is an archway. Prior to going through it, pick up the Fiery Large Shield in the SE corner. Equip it; you WILL need it, very soon. After going through the archway into Area B look to the right to find an Acid Vaccine. There is a bridge that is in the up position to the N, the lava flow forks and creates an island with a lever on it to lower this bridge and an archway to access it, and another archway to the E of you. As you approach the archway to the E, a Fire Jinn (hereafter FJ) will appear on the other side. These guys are common and carry a sword and shoot fireballs at you, even through the archways if the angle is good.
Go through the archway into area C and take out the FJ. He can drop a Rapier or a Potion. Another one can appear in this area later and drop the other item. To the N is a stone bridge over the lava to Area D. which has a Cune lying on the ground in the SW corner and another Lever to drop the bridge that extends over the lava flow to the N. As SOON as you kill this FJ, another appears in Area D in the W section. It will begin shooting fireballs at you. As you move across the bridge to confront it, hit the 'X' key to move the lever. Take out this FJ (Drops an Hpotion or Fiery Long Sword), grab the Cune, enter the archway to the W into Area E, activate the lever and pickup the Fire World Stone that is on the ground. This little feller is going to come in handy, but do not use it just yet.
Go back to Area D, cross the N bridge into Area F and take out the FJ (if he appeared; he didn't always appear each time I played through). He Drops an Hpotion. In this area you will find 2 Cunes and an Ashes* in the SW corner near the lava. This* is shown on the map as being in the next area. The map is wrong for the American Version. Head through the archway in the E wall into Area G and encounter a new opponent.
This Armored Jinn is called an Armored Jinn (hereafter AJ). Use the same tactics that help you to take out a FJ and he will go down, just a little later is all. He will Drop a Fire World Stone. Save it too. Cross the bridge to Area H and throw the Lever. Another FJ will appear in Area I across the lava and start tossing fireballs. Avoid them until the bridge is down. Then cross over and take him out. He Drops the Shadow Blade, a 'Twilight' weapon unique to the Tower, essentially a Katana. The Water World Boss can also drop this item later. The key drawback to this blade is that it puts you in darkness, limiting your sight to just a few feet in front of your face. But it does NICE damage here and now. Save it for the next area. An AJ will appear here on your way back out that did not Drop anything. Go through the archway in the E wall into Area J and take out the FJ here that Drops an Hpotion or Broad Sword.
Now, there is a small island called Area K made by the 2 lava flows coming back together that has a Lever and a shimmering flame in the air on it. There is also a bridge that is up leading over to Area L. You might want to use a Fire World Stone from here but you really will not need it. Move to the switch and throw it. As soon as you do (or a moment sooner) the shimmering flame coalesces into the Jinn Lord. Use the Hit/Magic/Hit/Magic/Hit tactic with the ice Spell Frozen Hornet (Ice Balls) for maximum efficiency. He Drops a Fire World Stone or the Summoner Ring of Fire. I have you take him out now because if you do not, he will throw fire attacks that look like earthquake shockwaves that do a lot of damage quickly. Grab the Cune here and the Cune in the middle of Area J.
Cross the bridge over to Area L and take out the FJ that has been tossing fireballs at you. You will find 2 Cunes on the floor and the Fiery Helm in the chest. Now, head all the way back to Area B.
As you go back, you will encounter FJ's and AJ's here and there. They all seem to drop only Hpotions or Fire World Stones. For right now, the stones are the preferred item to get. Back at Area B, take a quick jaunt back into Area A and take out the FJ that should be there. Go back into Area B and across the bridge (N) into Area M. Grab the Cune here. Now prepare yourself, because there can be as many as 5 possible FJ's appear in the next Area N which is through the W archway. Watch your health meter and finish them off. They only drop Hpotions. The chest has an Amulet of Guardian. The other item indicated on the map next to the lava flow is something I have never found. If you did find something, let me know. Exit this level through the door in the W wall and back into the Tower. Follow the path along the wall to the next level.