--------------------------------------
EW - Quaking Cavern
--------------------------------------
TO GET 100% Creatures = 28??
You enter Facing South.
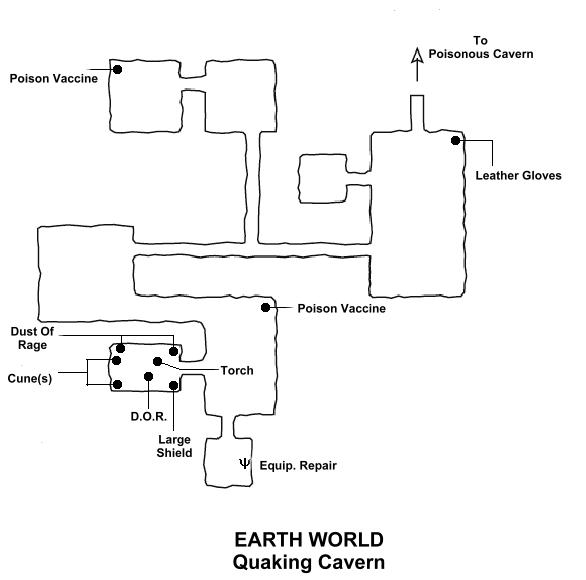
The first chamber you enter is full of Blue Flickers that also shoot lasers at you and small Sand Leeches that shoot clouds of poison gas at you. Immediately to the left of you in the corner is a pool with some Wooden Gloves in it.
The Blue Flickers have three tentacles, only one of which shoots at you. Keep to the side of the creature when attacking, but watch for the little Sand Leeches on the floor. They have a tendency to sneak up on you.
The small chamber in the W wall contains one Sand Leech. It never dropped anything for me. Go to the corridor leading into the SW wall and follow it until it branches straight ahead and to the right (N). At this point, each of the three tunnels becomes filled with a very large Sand Leech, each one fills it's own corridor.
They are all mouth and teeth and will poison you if they hit you. Stand a small distance away from the one you choose to attack and wait for it to try to bite you. Immediately move towards it, timing your swing to land when you get right next to it, then back off immediately. This can be tricky, because the floor here is somewhat irregular. What looks like a perfectly straight shot will sometimes be a clean miss. Then it's time for an Anti-Venom to take away the green tint that was just added to the screen.
Take the corridor that leads N and into the Acid Pod room.
These guys bounce around randomly and continuously spit acid at you. Keep moving and try to flank them to take them out. You will also find these in the room to the W in addition to some other creatures too.
The Kiljoy is a quick opponent. Keep moving and use the magic and sword combo to take them out.
Return back to the Sand Leech Corridors and take the W one into a new area. There is nothing to neither encounter nor find here, so take the South East corridor down into the next area. The Cocoon Plants here are VERY susceptible to fire.
Simply use the fire spells and a slashing attack to take these creatures out. They do not pivot, so moving behind them to avoid their attacks is easy.
Now go into the S room and you will find writing on the S wall and an ITEM/Smithy stone! Repair your equipment and get ready to die REAL quick.
Now go to the door in the W wall of the Cocoon Plant Room.
As you approach you will hear the grunting of the Torgs. Speed is essential here, as well as magic and strength. They have clubs and like to hit the ground with them, causing Loma-Prieta level seismic occurrences that drain you of HP BIG time, even on this side of the door. Try to get into the room ASAP and fire off a spell like the Frozen Hornet spell that has multiple hits. Use the Magic/Physical attack combo repeatedly until one of them falls and then take out the other one. When done in here, there is another that has appeared outside in the Cocoon Plant Room to take out.
Congratulations. That is the end of this region. Return to the door to the Poisoned Cavern after repairing your badly damaged armor and equipment.
--------------------------------------
EW - Poisonous Cavern (Brief return)
--------------------------------------
Once back in here, you will have to go all the way back around to the ladder area and head North to the door to Stone Cavern.