--------------------------------------
IW - Worship Domain
--------------------------------------
You enter this level facing N.
The best thing for you to do is walk and when necessary, WARP, your way back to the Watery Labyrinth and heal up the durability of your equipment. By now, if you have not traded a lot of things away for Hpotions and Mpotions, you should have a pretty big arsenal of equipment to choose from. Now you can really start having fun. Start combining equipment, weapons, amulets, bracelets and rings to bring out special abilities, like wear all the items you can that increase the Critical hit ability, which is actually a way of doubling the regular damage you can do. But, on occasion, I have managed to do 4x damage when the plusses exceeded +80. A VERY RARE occurrence, but taking down an opponent that took 10 normal hits alone with 3 hits was great fun!
This level is really pretty straightforward. Each set of opponents gather together in their own large chamber giving you plenty of room to maneuver and deal with them. It is this level that I will specifically recommend use of Holy Magic rings (and supporting equipment, if you have it), Frozen Hornet rings which by now are the primary ring you are wearing, Critical Hit Equipment (the Shadow Wolf, especially), And any equipment that has special properties that increase the Cold and Holy magic use. Otherwise, Go for Strength increasing equipment and a Great Sword and the Frozen Hornet. The Bows will be key in one chamber.
This level has 3 "LORDS of ILLUSION"; Gorthur, Willowess, and Fester. You must take all three out before you can continue on from here. It is possible to enter the next level with the boss in it, but you will not encounter her until you beat these three. So finish them here and you will have access to the Boss of Illusion World.
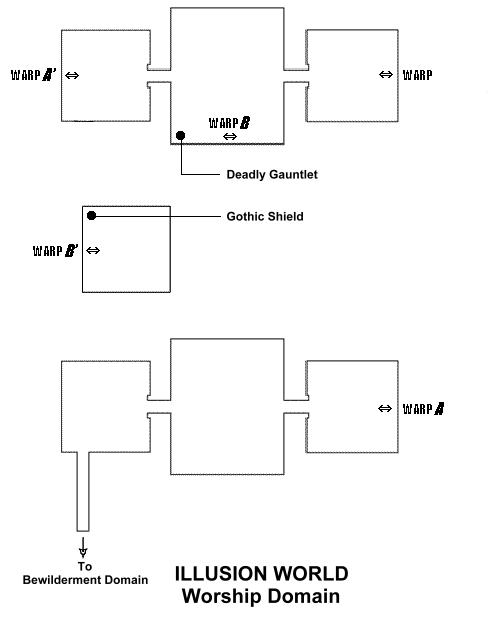
This place has Intra-Warps that I will reference using the following designations like A1, A2, B1, B2, etc., where A is a connecting Warp and 1 and 2 reflect which 'door' you are using. Thus A1 and B2 do not connect but B1 and B2 would.
To start out, first you should use a Bottle of Light. Equip yourself with one of the Illuminating Crowns, then proceed into the next chamber.
SURPRISE! That silly Mole beat you here, too! Talk to him once and then he disappears. No head E into the next chamber where you can hear the clinking of armor, the grunting of effort as a big sword 'whiffs' through the air. Yep, they're called Master Knights.
They usually appear in pairs and as soon as one goes down, another appears. They do not stun easily and continually try to jab you with their sword. Critical equipment and Frozen Hornet (FH) are best to bring them down, with Holy Magic a good backup/alternative. I usually only got one of them to drop one of the three swords I found here, but once I got 2 of them. Finish them, check your stats, and move on.
Holy magic and FH help a lot, Holy magic can stun him if powerful enough. Critical plusses help make this a short battle, but do NOT use the bows here. Save them for later. He has no one to help him, so take him down (pretty easy) and move to the back wall in the E that is 'pulsating' in and out. This is what I call intra-Warp A1, a minor WARP point that teleports you to another point on the same level. If you face the wall as you approach, you will walk 'out' of the other intra-Warp point facing the same direction.
WARNING. If while you are battling creatures in rooms with the Warp points and you back into a Warp, you will appear at the other Warp point facing the direction you were facing, NOT into the other room. It is therefore wisest to always walk face first into these points.
After exiting the Warp point A2, you find yourself in an apparently empty room.
You will not find any Cross Breeds in here until after you have entered the next chamber proper and then return. The Cross Breeds are flying crosses with faces in the middle. They are VERY FAST moving and shoot fireballs at you. Guess what their secret weakness is? Believe it or not, it is FIRE. Hard to believe that something that shoots fireballs can be brought down fast with the same thing, but then there is the old adage to 'fight fire with fire'... Trying to catch them to hit them can be tricky and will cost you a lot of HP, unless you protect yourself with lots of Fire Protection and a Fire World Stone prior to entry.
The next room is perhaps the easiest and most important.
The maps show that there is something to find in this room, but each time I come here there is nothing to find. I think that it is a unique item that I had already found. If anyone finds something here in the SW corner area before they kill anything, let me know.
Warpoors are essentially the shelled fish called the Nautilus but with a face in it that spits acid and floats in the air. They do not move but do pivot in place. I usually equipped the bow, made sure I had a Bottle of Light going, equipped Critical plusses, and headed into the far NW corner and, one by one, emptied my quiver until the room was clear. Easy. The occasional acid-ball did hit me, but I could live with that and it was the easiest and least painful tactic. Using Critical plusses and the Shadow Wolf is beautiful, especially when you get nothing but Critical hits on each one of these guys. You can one-swing each one!
Save the Warrior bow for the next level if you can.
Once finished, you have 2 directions you can go: E into the room with Fester and S into the Warp point B1 that lead to more Warpoors and Willowess. I recommend the Warp B1.
Upon entry, a Warpoor appears right in front of you to distract you while the other 2 on the left and right and Willowess (straight ahead) start taking points away from you. Instead of that, turn left (N) and go grab the Gauntlets on the floor. They increase your Critical hits +5.
Now, using Shadow Wolf or your most Slashing or Piercing weapon, take out the Warpoors. Willowess is just draining your magic, not your health. The Warpoors drain your health AND durability of what you are wearing with acid.
Holy magic works well on Willowess, when you can nail her when she is not teleporting. But if you watch the floor when she does, you can follow her shadow to where she is going and hit her when she re-materializes. When done enter Warp B2 and go to the E (and last) room where Fester (the Jester) is waiting for you all alone.
Fester shoots black lightning at you and teleports. Use Holy magic and Critical plusses to finish him off QUICKLY.It really is that easy. And now move to the E wall and into Warp C1 to the next Domain.